
Spoon Graphics | Latest Blog Entry |

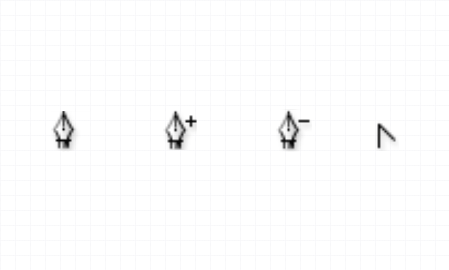
| Two Simple Techniques To Help You Master the Pen Tool Posted: 20 Sep 2010 01:00 AM PDT If you want to be a design master, you must first master the Pen tool. The Pen tool is one of the most important items in your Photoshop and Illustrator toolboxes and learning how to comfortably use it will open up new opportunities and speed up your every day workflow. Here’s a couple of techniques I use when working with the pen tool that I hope will help you get to grips with your bezier curves. The many faces of the Pen toolThe Pen tool comes with all kinds of options for creating, removing and tweaking bezier points and curves. All these options can be quickly selected using certain shortcut keys, or you can choose that specific tool individually from within the Pen tool stack. Let’s look at the different variations and what they do:
Pen Tool – The Pen tool Swiss army knife. All the following options are built right into the Pen tool and can be accessed using keyboard shortcuts. Add Anchor Point Tool – This variation of the Pen tool adds additional points anywhere on a path. (Also accessible by hovering over a path) Delete Anchor Point Tool – This variation of the Pen tool removes existing points from a path. (Also accessible by hovering over a point) Convert Anchor Point Tool – This variation of the Pen tool creates bezier handles on a point to form a curve. (Also accessible by holding ALT – Illustrator only) There’s also two other tools that are used alongside the Pen tool: Path Selection Tool – Used to select a whole path, including all points and curves. (Also accessible by holding CMD – Photoshop only) Direct Selection Tool – Used to select individual points or bezier handles. The pen is mightier than the errm… magic wandThere’s two main uses for the Pen tool; Drawing shapes and cutting things out. You can draw shapes with the Pen tool in both Illustrator and Photoshop, but you’re only likely to use it to clip images out in Photoshop. There’s no end to the type of shapes you can draw with the pen tool, you can make a straight line between two points or add a bend using bezier curves. This mixture of straight lines and curves of any angle allow you to draw any shape imaginable. There’s load of tools in Photoshop you can use to remove the background from an image. You could use the lasso tool, the Eraser, a layer mask or even the extract filter, but none of them give the the fine control that a carefully drawn path gives you. What’s more, you can save multiple paths in your document so you can reselect or make minor tweaks to the selection later. My two Pen tool techniquesI use one of two techniques when working with the pen tool. Which technique I use will depend on which application I’m using, as well as what I’m trying to achieve. Despite both Pen tools doing the same job between Illustrator and Photoshop, they don’t work exactly the same. You’ll need to remember to use two slightly different techniques when working between the two applications. Technique oneThis first technique works best in Photoshop, especially when creating a clipping path to cut out an image.
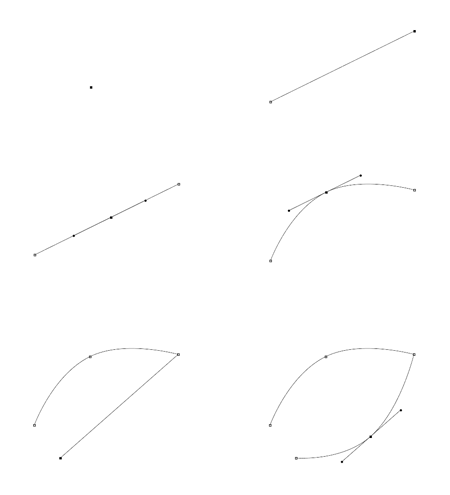
Step one: Add a starting point before the curve, don’t drag out any bezier handles – Just a plain old point. Step two: Add a second point at the end of the curve. Again, don’t drag out any bezier handles. You should be left with a straight line running between the two points. Step three: Hover over the straight path line and add a point half way along. In Photoshop this point is automatically given bezier handles. It isn’t in Illustrator, which makes this technique more difficult to use. Step four: Hold the CMD (or CTRL key on Windows) to switch the Pen tool to the Direct Selection Tool, then drag the new point into position to form a curved line. Step five: Keep the CMD (or CTRL) key held in order to drag each bezier handle into position to match the curve to the original image. Step six: Complete the path by returning to the start point. Look out for the small circular icon to confirm that the path is going to be closed. Technique twoThis second technique is more suited to drawing shapes, although the process is slightly different between Photoshop and Illustrator.
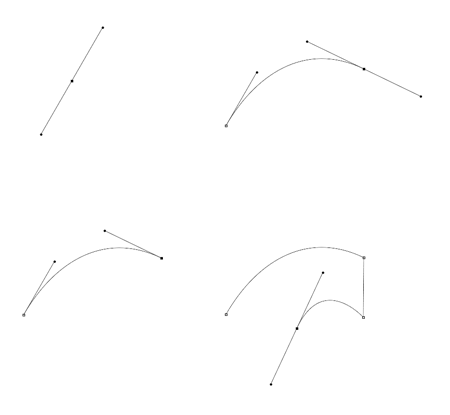
Step one: Click and drag a point. The dragging motion pulls out a single bezier handle which you’ll want to aim in the direction of your desired curve. Step two: Add a second point to create a curved line by clicking and dragging another bezier handle. Move the handle around into position before releasing the mouse. Step three: Single click (Illustrator) / Alt-Click (Photoshop) the end point to remove the bezier handle. You can sometimes get away without this step if your line is going to be smooth and flowing, otherwise you might end up with huge loops in your path when trying to navigate acute angles. Step four: Complete the path by returning to the start point. Look out for the small circular icon to confirm that the path is going to be closed. |
| You are subscribed to email updates from Blog.SpoonGraphics To stop receiving these emails, you may unsubscribe now. | Email delivery powered by Google |
| Google Inc., 20 West Kinzie, Chicago IL USA 60610 | |
Aucun commentaire:
Enregistrer un commentaire